Edible Printhead Maintenance Tips
Print Head Maintenance: Canon Edible Printer
While having the ability to refill an ink cartridge and enjoy almost-free prints, it's frustrating when your refill isn’t working correctly. If a printer is printing, but the output is blank or has poor image quality, it is often due to clogging. Not all bad prints are caused by clogging. An aging printhead may cause the problem as well in severe cases you may need to change the printhead.
Every time, you do not need to visit any printer repair shop. This printhead maintenance guide is created to help you resolve clogged or choked printhead issues.
What is Printhead
What a printer is supposed to do? The answer is “printing.” Printhead performs that principal role by transferring the minute droplets of ink through its numerous nozzles on the sheet to create the desired image. Blockage in the nozzles, which may happen over time due to factors discussed below, obstruct the smooth flow of ink. This diminishes the print quality, and when left without troubleshooting, it may slow damage the printhead itself.
What Causes Clogging of a Print Head
- The high viscosity of edible ink
- Crystallization of the ink ingredients or matter particles like sugar due to temperature as low as 18 °C (64.4°F)
- Sedimentation or deposition of ink ingredients in the nozzle due to idleness of the cartridge or the machine
- Placement of the printer in a cold environment near the window that clogs the printhead
How to identify a clogged printhead?
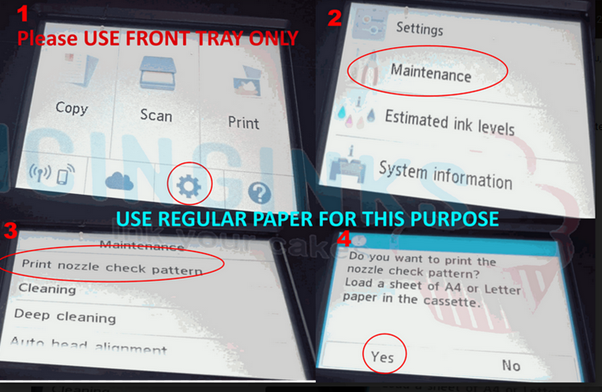
A clogged printhead affects the print quality or resolution badly. There could be shadowy, streaky or spotty print despite having an appropriate level of ink in the cartridge. It’s quite frustrating. Your printhead needs maintenance. To confirm the printhead issues, run Print Nozzle Pattern test using your Canon Printer Settings as follows: Go to Setting Or Gear icon on the printer LCD screen, tap Maintenance, and then “Print Nozzle Pattern”
Use plain A4 size sheet in the FRONT Cassette of your Printer. Do not waste frosting sheets or wafer paper for test prints. The print quality itself confirms the problem.
Print Nozzle Pattern Result : 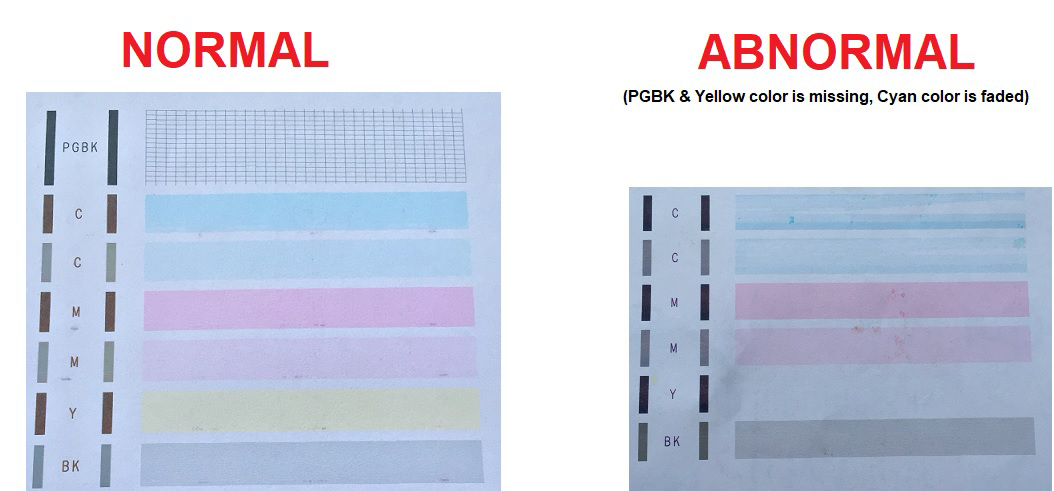
How to automatically clean a Canon Printhead?
The easiest way to resolve your print quality issue is by running a CLEANING on your printer. The cleaning function is included in the software of every Canon printer model and is usually found under the “printer maintenance” section of your printer’s display Menu. To perform Print Nozzle Pattern go to Setting or Gear icon on the printer LCD screen - > Maintenance > Cleaning
Repeat the cleaning two or three times. If you see no improvement, clean your printhead manually as discussed below.
De-Clogging or Fixing the Printhead Issues using Icinginks Printhead Flush Cleaning Kit Manually
Get the below items to start cleaning
- 1X Printhead Flush Cleaning Kit –
STEP 1: REMOVING THE PRINTHEAD
Open the top-lid of your printer. Wait until the carriage with the cartridges comes to the center and stops. Gently remove all the cartridges and place them on a clean surface. The removal technique varies from one model to another. Slide the printhead carriage towards right and power off the printer. Locate the front bracket, lift up the front tab with little force, the printhead comes up.
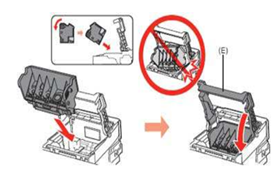
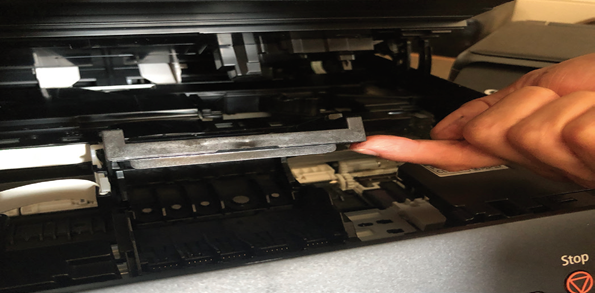 Feel inside to have your hand on the printhead. Tilt a bit towards yourself, and slide it out. It may take some time, so have patience.
Check this video on how to remove the printhead: https://www.youtube.com/watch?v=wM6oiPgfQfE
Cleaning the Printhead
Check this image of a printhead. It has a black compressed rubber seal/washer. If the washer does not return to its full size, it needs to be removed and cleaned. A "poor seal" fails to keep the colors separated and results in clogging.
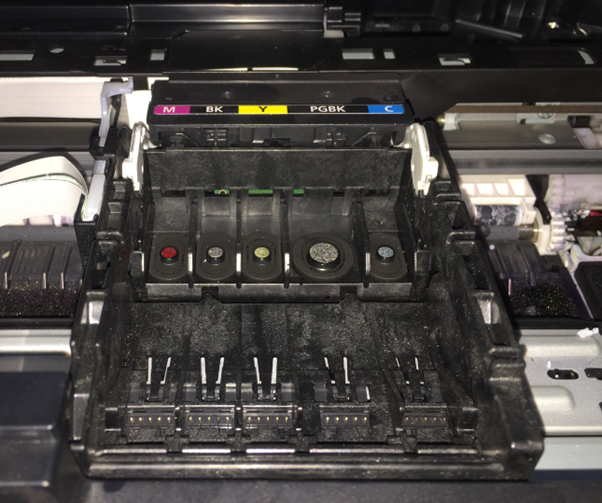
Image of Clog Printhead all the nozzles are clog
How to clean the printhead using Icinginks Printhead Flush Cleaning Kit
This is the perfect video on how to clean the printhead.
https://drive.google.com/open?id=1wfCYNSdHN8INGGr2EIPioEpS3feZ1ofT
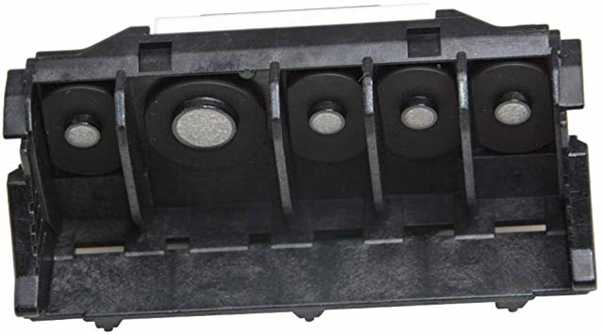
Image of CLEANED PRINTHEAD
ALTERNATIVE METHOD De-Clogging or Fixing the Printhead Issues USING HOT WATER (It does work but you may choose at your own risk we recommend to clean the printhead using our Printhead Flush Cleaning Kit)
Get the below items to start cleaning
- 1X Glass or Plastic Jug
- Lint-free cleaning cloth
- Hot water (Filtered and/or distilled)
STEP 1: REMOVE THE PRINTHEAD AND SOAKING THE PRINTHEAD
Heat the distilled water in a glass or jar until some steam appears on the surface (Boiling not required). Submerge the printhead into water. Make sure the water level is at least 1 or 2 inches above the printhead. Agitate it, and leaves it submerged for the next half an hour.
Remove the printhead once the time is up and rinse it. Repeat the process . Use fresh water every time until., Remove the printhead and leave it to dry completely on a paper towel.
STEP 3 DRYING THE PRINTHEAD
Place the printhead inclined to a vertical wall, so that water droplets come out. Now take your lint free cloth to dry the printhead completely. Alternatively, you may use a hair drier to blow a jet of air to dry the printhead, or apply an oil-free compressed air purchased from the market.
STEP 4 REINSTALLING THE PRINTHEAD
Reinstall the printhead back into the printer. Mind the uninstallation technique you applied to remove it earlier.. Do not apply force even if it gets stuck. Take it out and then reinstall it back. Lower the level (A3 Printer) or push in the front plastic level (A4 Printer). Check the ink level in your cartridges. If required, do a refilling and place them well in the carriage and place everything back into place. Now, perform a test.
Perform this Healthy Practice if You Do Not Use Your Edible Printer Regularly
Keep running a NOZZLE check to make sure that the nozzles or ink passages do not get chocked
All metal connector on the printhead must be wiped using a soft cloth soaked in alcohol to prevent rust formation on its surface on a regular basis
Perform a check of the printhead using the printer software on a regular basis
Note: You may also use a steam jet to clean your printhead nozzles. Make sure steam jet machine’s nozzle is tuned to bring out the steam with the right pressure.
If you have exhausted all the printhead maintenance procedures mentioned on this support page without hitting any success, call your Canon Customer Support or an experienced printer repair expert. It may be time to replace your printhead. Keep the compatibility aspect in mind while getting a replacement.